Tuesday, October 23, 2012

Lenny & Joe's T-shirt Quilt: Cutting (round 2) and (attempting to) sew the top of the quilt together

Please excuse me if I am too enthusiastic about this post....
I mentioned in the last post about my L&J t-shirt quilt that my sewing skills are at the kindergarten level, so the fact that I went
from this:

to this:


to this:


Has me pretty excited..I think I may have jumped up and down a few times when I finished sewing the last row...it's the little things people.

Okay, okay. I still have a lot of hills (mountains in my case) to climb before I can snuggle up under this thing, but figured I'd write about the very non-professional steps that I took to make the top of my quilt (if you are a skilled quilter you will probably want to pass on reading this post)

Anyway…
After cutting all of the shirts in half and removing the sleeves and collar, I started cutting out my logos using my 6” plastic template and a rotary cutter. The size of the logos varied pretty drastically. If the entire logo fit into my 6” square…great! If not I split up the logo and was able to get more squares out of a logo (see below)


I was able to cut 70 squares with logos, and then started to cut out filler squares (squares made from the plain part of the shirts)…I ended up with 120 squares and carpel tunnel.

** I originally wanted this blanket to be full sized which meant 200+ squares, but after laying out the squares on the ground I realized that full sized was just too big and that there would be more filler squares than logo squares. So, I decided 120 was a good stopping point**

Most t-shirt quilt tutorials recommend ironing fusible interfacing on the back of the squares so that the t-shirts don’t stretch when you sew them together. Unbeknownst to me you are supposed to iron the interfacing onto the shirts before you cut your squares…at this point I had two options:

1)      Cut out 120 squares of interfacing and iron 120 squares of interfacing onto each of my tshirt squares
2)      Continue sans-interfacing and hope for the best

Guess which option I went with….

I laid my squares out on my floor and re-arranged them until I came up with a pattern I liked.


 I organized them in “row piles” and moved on to the next (very scary) step…sewing.

I feel like every tutorial on how to sew a quilt is written in a different language…I simply don’t understand sewing/quilting lingo but, I took bits and pieces of different tutorials and finally figured it out…here is my very dumbed down version of how to sew together the rows of your quilt:
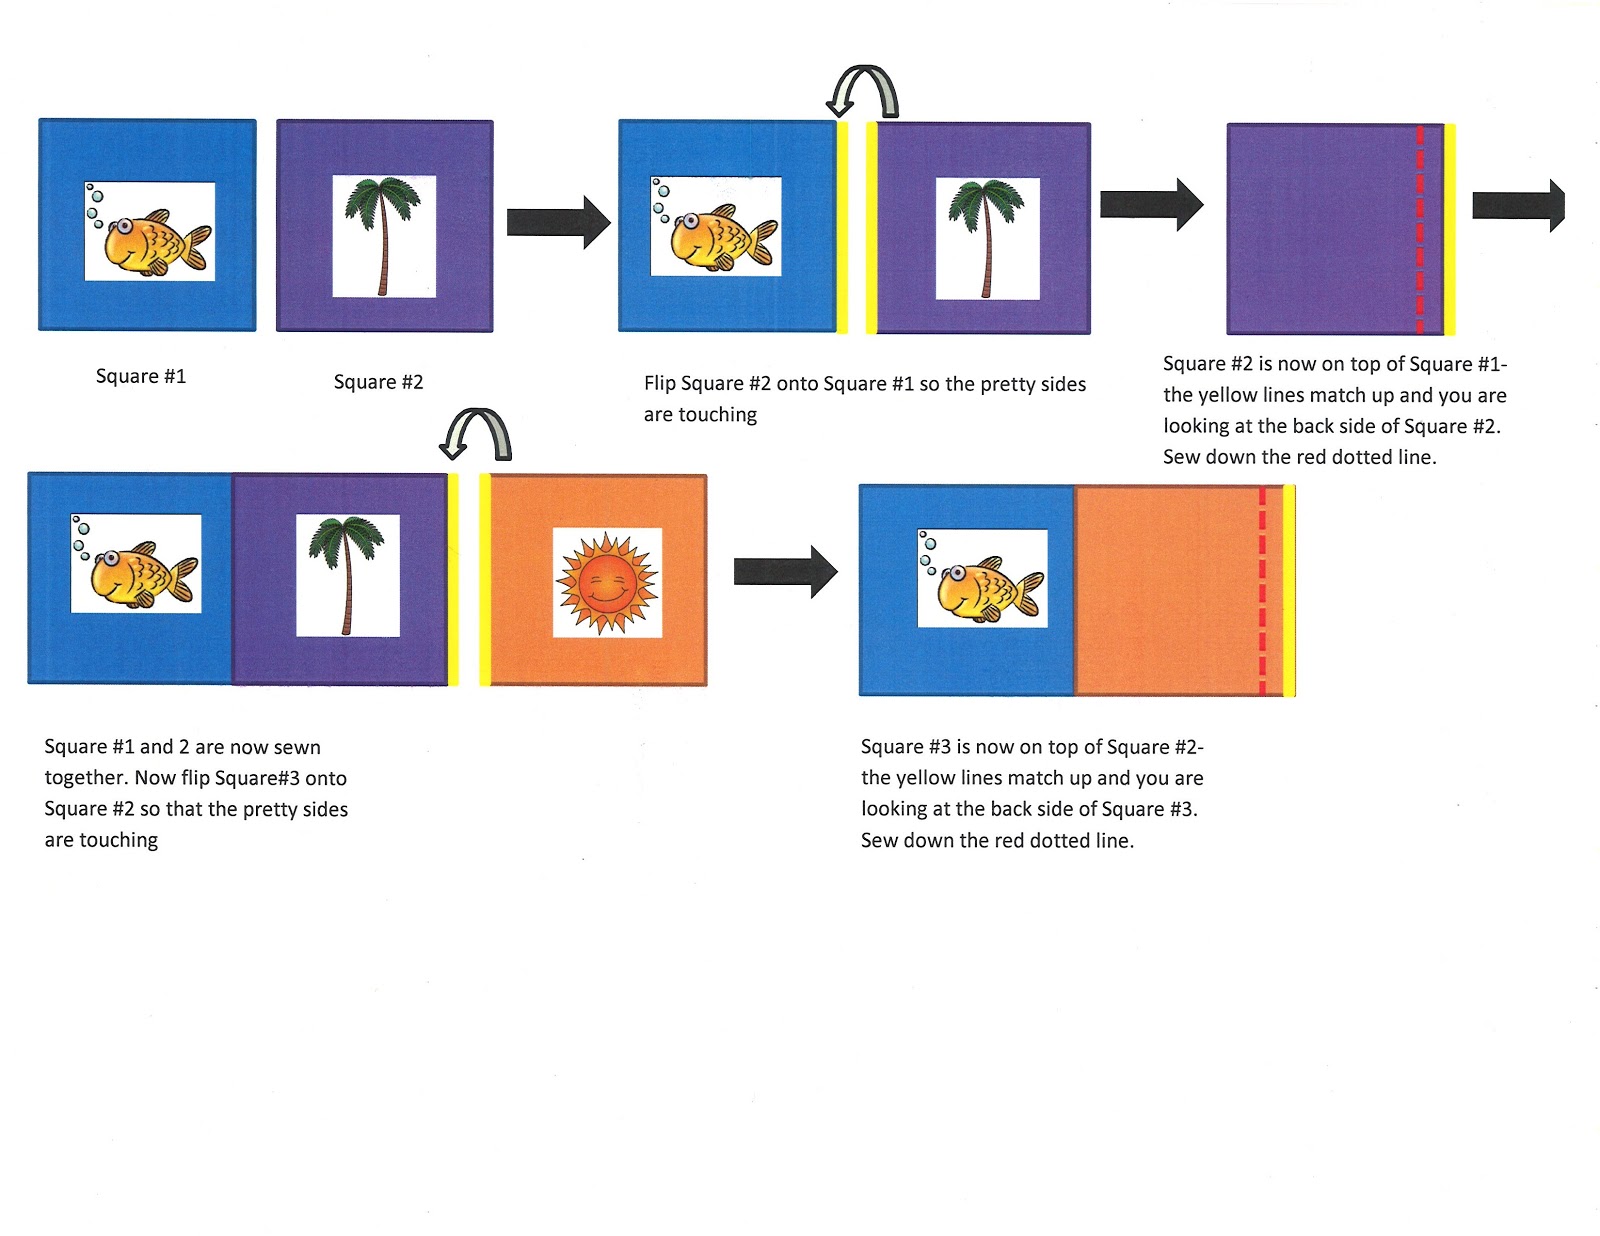

After I sewed two full rows (9 squares across) I sewed them together (using the same concept as above…line up, flip, stitch, unfold). I quickly realized that interfacing would have made for a more professional looking (read: evenly lined up) quilt top…but was happy with the way it looked nonetheless.

I continued the “sew a row, attach a row” until my quilt top was 10 rows long.

Next up- a border, some batting, and some backing.

Stay tuned!

Wednesday, October 17, 2012

Join!

You can now be a member of Made with Love. Paid with Pennies!

Just click "join this site" over here --->
Joining is just like hitting the "like" button on facebook. It lets me know that you are reading what I am writing and lets you post comments/questions/suggestions.  This is different from the "follow by email" field.
In the blogging world, the more members the better...so help me out!

Thanks guys!

http://www.goinghometoroost.com/


Tuesday, October 16, 2012

Baby Steps: Lenny & Joes T-Shirt Quilt-Washing, Measuring, and Cutting (round 1)

There is a little place in a little town that I have a little (okay, big) obsession with.
I am not alone though; my parents, sister, aunt, uncle, and cousins all feel the same way.

It isn’t a fancy place; in fact it is just the opposite...The decor is minimal, the line to be seated is substantial, and the parking…a nightmare.
But, if you like the beach, a good lobster roll, and $5 t-shirts then I think you, like me (and my family), would love this little place.
http://www.etsy.com/listing/69484673/salt-air-hair-8x10?utm_campaign=Share&utm_medium=PageTools&utm_source=Pinterest
This little place (restaurant) is called Lenny & Joe’s and it’s in the little town of Westbrook, CT. We vacationed in Westbrook almost every summer when I was growing up. Lenny & Joe’s was always our go-to spot for dinner … and our parent’s go-to spot for happy hour(s).

 http://www.roadfood.com/Restaurant/Overview/1033/lenny-joes-fish-tale

Oh, and those $5 t-shirts I mentioned, I have over 20 of them- all different colors, different years, different designs.

The other day I sorted through my dresser and got rid of things that I no longer wear. As much as I love L&J’s, most of the 20 t-shirts fell into this category. Throwing these shirts out is not an option- no way, no how… but I know that they are just wasting space in my drawers.

My solution:
I am going to step out of my comfort zone, turn on my sewing machine and attempt to make a Lenny & Joe’s t-shirt quilt

**Please Note** Sewing is not exactly my forte. I have never sewed anything other than straight curtain panels and square pillow covers…this is going to be a lengthy process!

In order to successfully tackle this project, I am going to need to take baby steps. So, instead of writing one big post when I am finished (hopefully that day comes) I am going to write mini-posts as I go.

Without further ado:

Lenny & Joes T-Shirt Quilt:  Washing, Measuring, and Cutting (round 1).

Wash: I washed and dried all of the shirts and then laid them out on the floor to see what I am working with.


Measure: I am using an 6” block and want to make a fullish-sized quilt (every website I looked at had different measurements for full-size…but it is around 84" x 90").
I put my super strong math skills to good use- scribbled down a complex formula, used my TI-83, and called my math teacher sister to confirm that I will need 110 8” blocks.
Just teasing: 
Width: 84”/6”=14
Length: 90”/6”=15
# of blocks needed: 14x15=210

Cut (round 1): Most of the t-shirts have a small logo on the front and large one on the back. I plan on using both sides for my blocks.
I cut each t-shirt in half so that the front and back are now separate.

Stay tuned!

Sunday, October 14, 2012

journey for a new dresser

It is amazing what a little elbow grease and a fresh coat of paint can to do to an old piece of furniture.
My dear friend Annie recently moved into the same apartment complex as me. That means two things:

1) My project list has gotten quite a bit longer
2) lots of wine will (and already has been) consumed on our porches

#1 and #2 are often combined…it really is the best of both worlds
Up until yesterday, Annie was using Tupperware drawers as a dresser. No, this was not a temporary thing while she settled into her new place…these Tupperware drawers had a fixed spot in her last apartment…that she lived in for 3 years…bless her heart.

Proof: 

She was fully aware that I wasn’t going to let this fly.  She even turned herself in…admitting that it was time for a big girl dresser. She logged on to Ikea.com…I laughed and told her and our friend Leigh to hop in my car. I drove us straight to the Salvation Army Store.
Once she picked her jaw up off of the floor, I told Annie to take a look around and see if she liked the lines of any dresser in the furniture section. She looked at me like I had 12 heads and then reluctantly proceeded.
Some convincing and $75 later Annie and Leigh were back in my car…


This gem (okay, it needs a little TLC) is made of real wood. It has dovetail drawers, lots of storage, and has just enough detail for it to look feminine but not too ornate. I promised Annie that it would not look like a “grandma’s dresser” after I was done with it.


That Monday, I sent her a as shopping list for our Home Depot trip that we were going on that night.


A few nights, bottles of wine, and coats of primer later we replaced the Tupperware drawers with this:

What do you think?
How to:
The steps to painting furniture are quite similar to painting kitchen cabinets (you can find those steps here), but I will repeat them anyway.
Step 1: Remove all hardware. Make sure you keep all of the hardware (screws and all) together.
If you are changing the color of the handles/knobs, soak them in a little warm water and some dish soap. Rinse and let dry. Once they are dry, rub them down with a bit of sandpaper. Rinse and let dry again. Brush them with a thin coat of primer. Let dry. Bring them to a well-ventilated area and spray them with an even coat of spray paint. Let. Dry.


 Step 2: The first step of painting any furniture is cleaning it. This dresser was old, but not super dirty, so we got away with using a simple damp cloth. If your dresser really needs a good scrubbin’, use TSP to clean all the dirt and grime away…let dry.
Step 3: Next up is sanding. You want to remove any shine from a previous coat of stain or paint, but you don’t want to sand too much and ruin the wood. I use 180-200 grit sand paper. Just scuff it up a bit. After you have sanded all of the surfaces that you plan on painting, run a damp cloth over the piece to remove the dust (painted-over dust doesn't look so hot). Let it dry.

Step 4:
This dresser had a few deep nicks that I wanted to fix up- if yours does too, use a little bit of wood filler in the spots that you want to.. yep, you guessed it, fill in. After the filler is dry, lightly sand each spot so that they are flush with the rest of the wood.


4) Finally we get to the painting part. Coat all surfaces that you plan to paint with a thin coat of primer. Make sure you use a high quality brush (read: Purdy). You don’t want a bunch of bristles stuck in your finished  product, do you?

Let the primer dry.
Coat #1. Paint a thin coat of oil based, satin finish paint onto your piece of furniture. Don’t gob on the paint…it just leaves drip marks which aren't very cute. 
Let coat #1 dry.
Repeat the above for the second and third (if you need it) coat.
I used a brush for the drawers and the front of the dresser and a roller for the top and sides of the dresser. The brush helps you paint the “detail” of the furniture, and the roller makes the process go 10x faster.
The last step is to polyurethane the entire piece. Polyurethane is a protective coat that will help the paint keep its color and resist stains. It also gives paint a nice finished look. One thin coat is all you need.
Let it dry.
Screw your hardware and handles back into place and enjoy you new old dresser.


Wednesday, October 10, 2012

Tulip-Color

What you are probably thinking: “Jenna is being lazy. Posting mood board after mood board…heck has she run out of projects?!”

My response to your thoughts: “That is not the case!! Life has been a bit hectic lately, I promise to bring you some DIY projects soon!”

In the meantime, I wanted you to know that I haven’t forgotten about you. So, a mood board it is…

I love tulips and I love this bold color scheme... I think "tulip-color" from design-seed is going to be the palette for my next bedroom.

http://design-seeds.com/index.php/home/entry/tulip-color


Wednesday, October 3, 2012

Sunday Tones

Few things say Sunday like football in the fall. Football fan or not, I bet you have watched a NFL or CFB game (or at least parts of one) in the past month…if not, you will before the season (football season and fall season) is over…it’s tough to avoid!

Take a look at this palette from design-seeds.com
http://design-seeds.com/index.php/home/entry/sunday-tones

 … I think that these are the perfect colors to design a cozy living room around…. A place where friends/family can hang out, eat chili, drink beer or, if you are like my girlfriends and me, white wine, and of course watch a football game. Here is what I came up with.


Tuesday, October 2, 2012

a-z

Made with Love, Paid with Pennies has almost 2,000 views in just over a month! I have made it on to pinterest, and I have even gotten several requests to help people decorate their home or apartment!  I am so happy that you guys are enjoying my posts, I really love sharing my tips, tricks, and random thoughts with you all-- we should get to know each other better...I think I owe it to you!

Here are some ABC questions and answers.  I got this idea from one of my favorite blogs, em=me.
Age: 24- my friend Annie calls me a spring chicken
Bedsize: queen.
Chores that you hate: none really. I know this sounds strange, but I love a clean apartment more than I hate doing the chores to have one
Dogs:  nope. I do have a cat named Kemba....if you are wondering if she is named after Kemba Walker the answer is yes. When I get a dog it will be a pomsky and his/her name will be Calhoun- go UConn!
Essential start to your day: Weekday- a long run. Weekend-coffee on my porch.
Favorite color: depends...For a car, red. For a wall, grey. But if I had to pick an all time favorite it would have to be turquoise 
Gold or Silver:  I'm kind of partial to gold lately.
Height: 5 feet/3 inches...I am a short spring chicken
Instruments you play: the radio- I love music but cannot create it.
Job title: Financial Analyst.
Kids: one day.
Live: Charlotte, NC.
Mother's Name: Catherine...which is my middle name
Nicknames: Jen, Jenna Benna,Jenny (only my mom), Sissy (my sister, go figure) Boopernoodle (my dad- don't ask because I don't know why), Seven (my brother in-law- You can ask about this one)
Overnight hospital stays: Not Once.
Pet peeves: When someone raises one eyebrow. When people chew with their mouth open.
Quote from a movie or tv show:  "you had me at hello"
Right or Lefty:  Righty.
Siblings: I have an older sister (Sissy to me, Alyssa to others)
Time you wake up:  Usually somewhere around 6:30.
Underwear:  Yes?
Vegetable you hate:  Raw Mushrooms- I don't hate them, but I wouldn't pick em.
What makes you run late: Having too much time to get ready. I tend to lolly gag. Or blogging in the AM... like I am doing right now.
X-Rays You've Had:  my knee, my teeth.
Yummy food you make: lasagna
Zoo Animal:  Orangutans.