Friday, September 28, 2012

Hanging Curtain Rods 101

Hanging curtain rods at the same height and same distance from a window can drive a person batty… especially if they don’t read this little ol’ blog of mine…

I came up with this “method” of hanging curtain rods a few months ago…I had one of those “duh!” moments and immediately kicked myself for not thinking of it sooner.

So, without further ado, the easiest & fastest way to hang curtain rods:

1) Draw a right angle on a piece of cardstock (I didn't have a piece of cardstock handy, so I used a folder).

 2) cut along the lines you just drew and Voila! you have a template.

3) Line up the corner of the window frame with the corner of the right angle on your template. Mark your wall at the top corner of the folder.


4) That pencil mark you just made is where you will drill in the screw that will hold your brackets in place


5) Repeat on the other side of the window.


It really is fool-proof!

Wednesday, September 26, 2012

States for Stewie

I mentioned in my “"I'm a Nutmeger, Jersey Girl, Bostonian & Southern Belle wrapped up into one" post that I prefer personalized art over any fancy shmancy famous piece.

I think that personalized pieces are “smile generators” – who doesn’t smile when they see something that reminds them of vacations they took as a child, their time away at college, or even an inside joke that they have with a good friend…that’s right, no one.

My dear friend at work- we call her Stewie- seems to agree that personal art adds a special something to a room. She asked me to come up with something that told the story of her and her adorable little family.

She and her hubby are both from Virginia, but they met (and got hitched) in West Virginia. They are now raising 3 cuties in North Carolina….here is what I came up with (using Microsoft Word and a laser printer). 


Good thing Stewie’s husband isn’t much of a blog reader(at least I don’t think he is), because I think the plan is to give these to him for Christmas. I hope he likes them... Lots of pressureQ

**I will update this post when Stewie frames them and hangs them up, I was just excited to share!**

Monday, September 24, 2012

Alyssa's Bridal Shower, Part 2

After all of my sister's bridal shower invites were made and sent (see that post here) I moved onto the decorations. Again, I didn't want anything to look too summery- so I tried to incorporate a "rustic" look into her red, yellow, and orange color scheme.

Here is what I came up with for the mantle...


And for the table settings...
Idea from: http://www.orangebeautiful.com/blog/post.php?post_id=1274 


 And for the cocktails...
Printer paper, old frame, and a little doodle
Wine Tags! Made with the same punch I used on the shower invites. Each tag had a word that relates to weddings written on it - If you remembered your word (which became more difficult after each pour) you never lost your glass.


I designed these labels and printed them on special waterproof labels from http://www.onlinelabels.com/water-bottle-labels.htm

 And for the food:

Buffet table, Pre-Food

My mom and I picked out all of the red, yellow and orange starbursts- (and ate all of the pink ones!)
 Remember these cards that I included in every invite...


 Here they are put to good use!

The "print your address" part of the sign above was so that the bride didn't have to write out the addresses of all of the guests when she wrote her thank you cards...every little bit helps!!

And for good measure....


Wednesday, September 19, 2012

As-Is & Attitude

I would be remiss if I didn't bring it back to the As-Is section every so often.

See the arrow in the photo below...
In the As-Is world, that little green mark means $0.50...yep, that's right. The sign above my couch cost me $1.50 (insert fist pump here).


I had a big wall to fill, and no idea what to fill it with until I came across this card that my sister sent me right as I was starting my job in Charlotte...

I first thought that I would paint the saying on a huge piece of wood. But sometimes you have to work with what the As-Is section has to offer...in this case, I think I made out like a bandit.

The yellow, which matches my curtains, was already painted onto the pieces, so all I had to do was paint the words onto each board (freehand with pencil and then fill in with black paint). 


Hanging the 3 boards so that they were spaced evenly was a lot easier than you may imagine.
I started with the bottom board (the"can't do" one)
I simply nailed it to the wall (through each corner) after making sure it was perfectly level. Next, I placed a yard stick on the top of the board I just put up, rested the second board ("attitude and a good pair of boots") on the top of the yard stick and secured it in place the same way I did the first, I repeated this step to hang the top board.

And there you have it- $1.50 for a piece of wall art.

Friday, September 14, 2012

Made with love, paid with 16 pennies

Looking for a quick little DIY project that costs next to nothing, can be given as a gift, and can be personalized ?

Well look no further!

If you are like me and have an abundance of scrapbook paper lying around and gallons of mod podge stored away, a set of these little guys will ring in at less than $2 …

What you need:
* Tiles (I make sets of 4 or 6 coasters) -- at 16 cents each you can go coaster crazy if that's what you're into
* Felt Pads
*Mod Podge
*Scrapbook Paper
*Foam paintbrush or paintbrush with soft  bristles
*Scissors or rotating cutter
*Straight edge
*Water-resistant, clear acrylic spray ($5 at Home Depot)


Making these things are pretty darn easy...but there is one very important detail...make sure you make your coasters on PLASTIC- Mod Podge forms a tight bond when applied to paper (hence why we are using scrapbook paper to make these things...)
1) paint a thin coat of mod podge onto a tile
2) place a piece of scrapbook paper (cut to size, design facing up) on the mod podge coated tile
3) smooth with your finget to get rid of any air bubbles
4) paint the entire top of the tile with a thin coat of mod podge
5) let dry
6) repeat step #4 two more times
7) spray with acrylic spray
8) stick on those felt feet

9) turn over, and place a nice cold beer on top.


Thursday, September 13, 2012

business in the front, party in the back

I was SO excited when my sister got engaged....I knew that her wedding would be the perfect opportunity for me to put my DIY skills to good use!
Oh, and I was super happy for her and my (now) brother-in-law :)

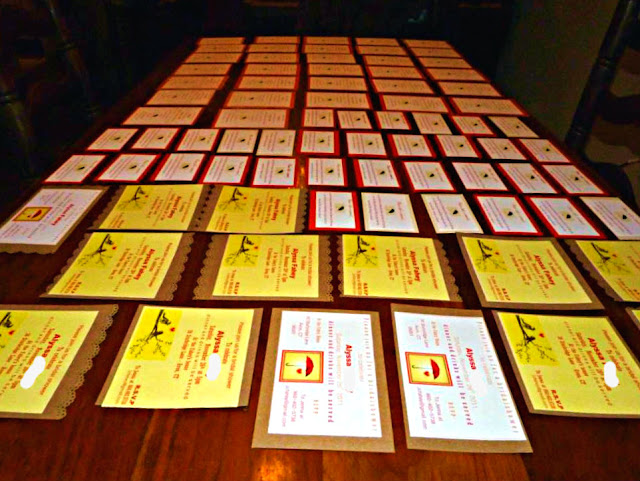
First project- the bridal shower invitations...

I wanted to stick with her wedding colors, but didn't want the invites to look too summery since the shower was the weekend of Thanksgiving. I bought the card stock from Michael's craft store, used a paper cutter from work and used a glue runner to attach all of the pieces together. I came up with a few different designs, and in the end couldn't decide which one I liked best- So, I made them all.


I had extra water bottle labels lying around my apartment, so I used them to make the address labels for the invites.

Fun Fact: Did you know that you should treat a return address like a mullet? If you are sending a business letter or invitation, your return address should go on the front of an envelope. If you are sending a personal letter or party invite, your return address should go on the back of the envelope...

Business in the front, party in the back


Here are a few more photos:


Monday, September 10, 2012

I'm back

 I took a mini vacation from blogging this past week and did not like it one bit. Everyday that went by sans post made me feel a little sad, guilty even...so I am back...did ya miss me?

Here is my take on autumn brights:


http://design-seeds.com/index.php/home/entry/autumn-brights