Tuesday, November 6, 2012

"Wherever you are, be all there" -Jim Elliot

Last week I posted  about a trip I took to the Goodwill Store. I mentioned buying 3 pieces of furniture for $1.99 each... but then only wrote about one...what a nerve!

Well, here is number two...plus a little extra.

I found this little shelf in the back of the store. It's a beauty, don't ya think?


No?

Nah, I didn't either. What I did think is that with a little primer and paint this thing could be quite cute.

I debated on color and use for a bit. At first I wanted it to be painted grey and used as a perfume/jewelry holder in my bedroom. I realized though that the wall it would have to go on is way too big for this tiny shelf.

So, I moved on to Plan B: paint it and figure out where it will go later.

Here is the end result of Plan B:


As soon as I drilled this guy into the wall- I knew that I wanted to upgrade this wall even further. I love my new (old) tea station, but the wall needed a little more pizzazz. So, I went crazy...


This is now my favorite wall in my apartment. I re-used all of the frames except for the 3 teal ones, so it only cost me around $20 bucks (and a whole lot of measuring) to complete the entire thing.

I started by laying out the pattern of frames on my kitchen table (even though I didn't follow this pattern exactly, it gave me a good idea of what I was working with)


Everything on this wall says something about me... My family & friends, the beach, UConn, and my new favorite quote "wherever you are, be all there"- Jim Elliot

....I smile when I walk into my kitchen and see photos of everything/everyone I love all in one spot.


Thursday, November 1, 2012

mini makeover and mixing patterns

I performed a RAD yesterday..you know, a random act of decorating.  Don't ask me why because I won't be able to tell you, but I randomly got off my couch walked over to my linen closet pulled out some old pillow shams and a red blanket that I had stuffed away. Apparently I felt that it was time to change the color scheme in my bedroom. I know, I am weird.

My mini bedroom makeover was free and was just enough change for me to feel like I created a new, fresh space. Which version of my bedroom do you like better?


My quick switch of shams got me thinking about mixing patterns. Combining stripes and flowers and checks can be a bit unnerving....especially if you are the matchy matchy kind. But, bringing different patterns and pops of color into a room give it more personality and energy. Here are my very unofficial rules on how to mix patterns

1) Use a multi-color pattern as your "base". Pull colors from that pattern into the rest of your room. 

2) It isn't necessary for all of your patterns to be made up of all the same colors. As long as they share similar tones and shades (mix pale colors with pale colors and deep tones with deep tones) you can mix to your heart's content. 

3) Vary the scale of your patterns. You don't want your prints to be competing for attention. A large floral pattern looks best next to a smaller check or pinstripe. 

4) Combine different textures and use your color scheme to marry them. The layering effect of mixing textures and patterns livens up a room.  Mix linen with cotton and velvet with silk...go for it, you have nothing to lose. 

Happy Friday!
xoxo

Monday, October 29, 2012

Goodwill Finds

There are few things that get me more excited than finding a piece of furniture at the Goodwill or Salvation Army store that just needs a little TLC to go from drab to fab...okay, that may be an exaggeration, but it is pretty exciting.

My success rate was pretty high this weekend. I bought 3 pieces of furniture. Each piece was $1.99 and each is totally makeoverable (I made that word up).

I had time to finish sprucing the first piece I found...a bathroom shelf

Here is what it looked like before (that price tag says $1.99..woo hoo!)


and here is the after:


All I did was prime, paint, and polyurethane the shelf with the same primer, paint, and polyurethane that I used on Annie's dresser. (free)
Then I headed over to good ol' Home Depot and bought a super thin piece of plywood. I had an associate cut it down to size for me (19"x19") and left the store spending just over $4.

I had a little bit of burlap laying around that I attached to the wood using a staple gun (fold the fabric over the wood like you are wrapping a present and staple in the back) (free)

Using my level and my drill I replaced the ugly shelf that I had hanging in the bathroom with my new goodwill find.


------->


for a total of $6. 

Oh, and for those ladies out there that have makeup brushes shoved into a makeup bag or random bathroom drawer, take a look at the first shelf...

This is an awesome way to store your brushes so that they don't get bent out of shape in between uses. I think it looks kind of pretty too.


The square glass is from Michael's Arts & Crafts.
With the 40% coupon that comes out every week it cost $2.99 (why they don't just mark down the entire store by 40% and save paper is beyond me). The pebbles are from Ikea and cost $1.99.


Saturday, October 27, 2012

Lenny & Joe's T-Shirt Quilt- Finished!!

holy crap. I cannot believe it.

I am DONE with my Lenny & Joe's T-shirt quilt. Given my elementary sewing skills, I am rather shocked that I didn't end up with a quilt shaped like a trapezoid. I must be honest...this thing has got a whole lot of character. Not because it is made out of sentimental t-shirts, but because I am pretty certain there is not one line that is sewn straight. The squares don't line up, and the binding looks like I attached it with my eyes closed. But....I love it!


My last L&J T-shirt quilt post was about cutting out the logos and sewing the rows together - As I moved on in the process, I quickly realized that that was the easy part. The next step was to attach a border and then attach batting and backing to my rows. The final step was to bind the entire thing together.

I didn't take many photos of these steps because I was too tangled up in thread and fabric to do so, but I used a great tutorial to figure out what I was doing...Diary of a Quilter.

Attach a border:
This quilt is not a pretty quilt, and not because my rows don't line up (though, that is also a reason) but because there are fish on it...big ugly fish. It's a "fun" quilt not a "serious" quilt. This is why I used random pieces of fabric from some of my other projects to create my border:

My mom and a friend cutting my dress with swiss army knife..Note to self: If it is July and you are tailgating in North Carolina- do not wear a maxi dress..it is too hot! Note to you: check out the dude in the background!
Anyway: I created a border on my quilt using the same method I used to create and sew my rows together. Cut all of the fabric to the same width (since this is an eclectic quilt, I didn't care if the pieces were all the same length) and attach them together just like you did the pieces that make up the top of your quilt: pretty sides together and then sew together on the right hand edge....open and repeat. My picture tutorial of how to "sew rows together" can be found here.

Make four strips of fabric pieces that are a little bit longer than each side of your quilt. Attach the strips to to each side of the quilt by using the same method mentioned above.

Next Up: Basting the quilt

Sorry for the fancy language. Basting just means making a quilt sandwich: Backing/Batting/Quilt Top

Lay your backing on the ground (pretty side down). I used an old sheet (that kind of looks like a men's button down shirt...get it...T-shirt quilt), but you can use any cotton fabric you want. and lay your batting on top of your backing.

I used 100% cotton batting (it is the only thing I bought to make this quilt..woo hoo thrifty!)


Once you have the backing and batting laid out nice and smooth on the ground (which would be easier for me to accomplish if I didn't have a cat who thought she was the Queen of Sheba) lay your quilt top on top of the batting:


Next up: quilt this darn thing.

Since my rows were more evenly spaced than my columns, I only sewed horizontal lines to hold my quilt sandwich together. I started at the border and made my way up the quilt. I then sewed down (vertically) the edges the right and left edges. Here is a very elaborate drawing to help you understand...just kidding.

The blue lines indicate where I sewed.


Last and final step. Binding.

Binding hides all of your rough edges around the edges of your quilt. The Old Red Barn Co. Blog has the best binding tutorial out there. The only thing I did differently from this tutorial is machine sew, rather than hand sew, the binding to the front of my quilt.

Once you are done binding the quilt together you are done.
d.o.n.e!


Tuesday, October 23, 2012

Lenny & Joe's T-shirt Quilt: Cutting (round 2) and (attempting to) sew the top of the quilt together

Please excuse me if I am too enthusiastic about this post....
I mentioned in the last post about my L&J t-shirt quilt that my sewing skills are at the kindergarten level, so the fact that I went
from this:

to this:


to this:


Has me pretty excited..I think I may have jumped up and down a few times when I finished sewing the last row...it's the little things people.

Okay, okay. I still have a lot of hills (mountains in my case) to climb before I can snuggle up under this thing, but figured I'd write about the very non-professional steps that I took to make the top of my quilt (if you are a skilled quilter you will probably want to pass on reading this post)

Anyway…
After cutting all of the shirts in half and removing the sleeves and collar, I started cutting out my logos using my 6” plastic template and a rotary cutter. The size of the logos varied pretty drastically. If the entire logo fit into my 6” square…great! If not I split up the logo and was able to get more squares out of a logo (see below)


I was able to cut 70 squares with logos, and then started to cut out filler squares (squares made from the plain part of the shirts)…I ended up with 120 squares and carpel tunnel.

** I originally wanted this blanket to be full sized which meant 200+ squares, but after laying out the squares on the ground I realized that full sized was just too big and that there would be more filler squares than logo squares. So, I decided 120 was a good stopping point**

Most t-shirt quilt tutorials recommend ironing fusible interfacing on the back of the squares so that the t-shirts don’t stretch when you sew them together. Unbeknownst to me you are supposed to iron the interfacing onto the shirts before you cut your squares…at this point I had two options:

1)      Cut out 120 squares of interfacing and iron 120 squares of interfacing onto each of my tshirt squares
2)      Continue sans-interfacing and hope for the best

Guess which option I went with….

I laid my squares out on my floor and re-arranged them until I came up with a pattern I liked.


 I organized them in “row piles” and moved on to the next (very scary) step…sewing.

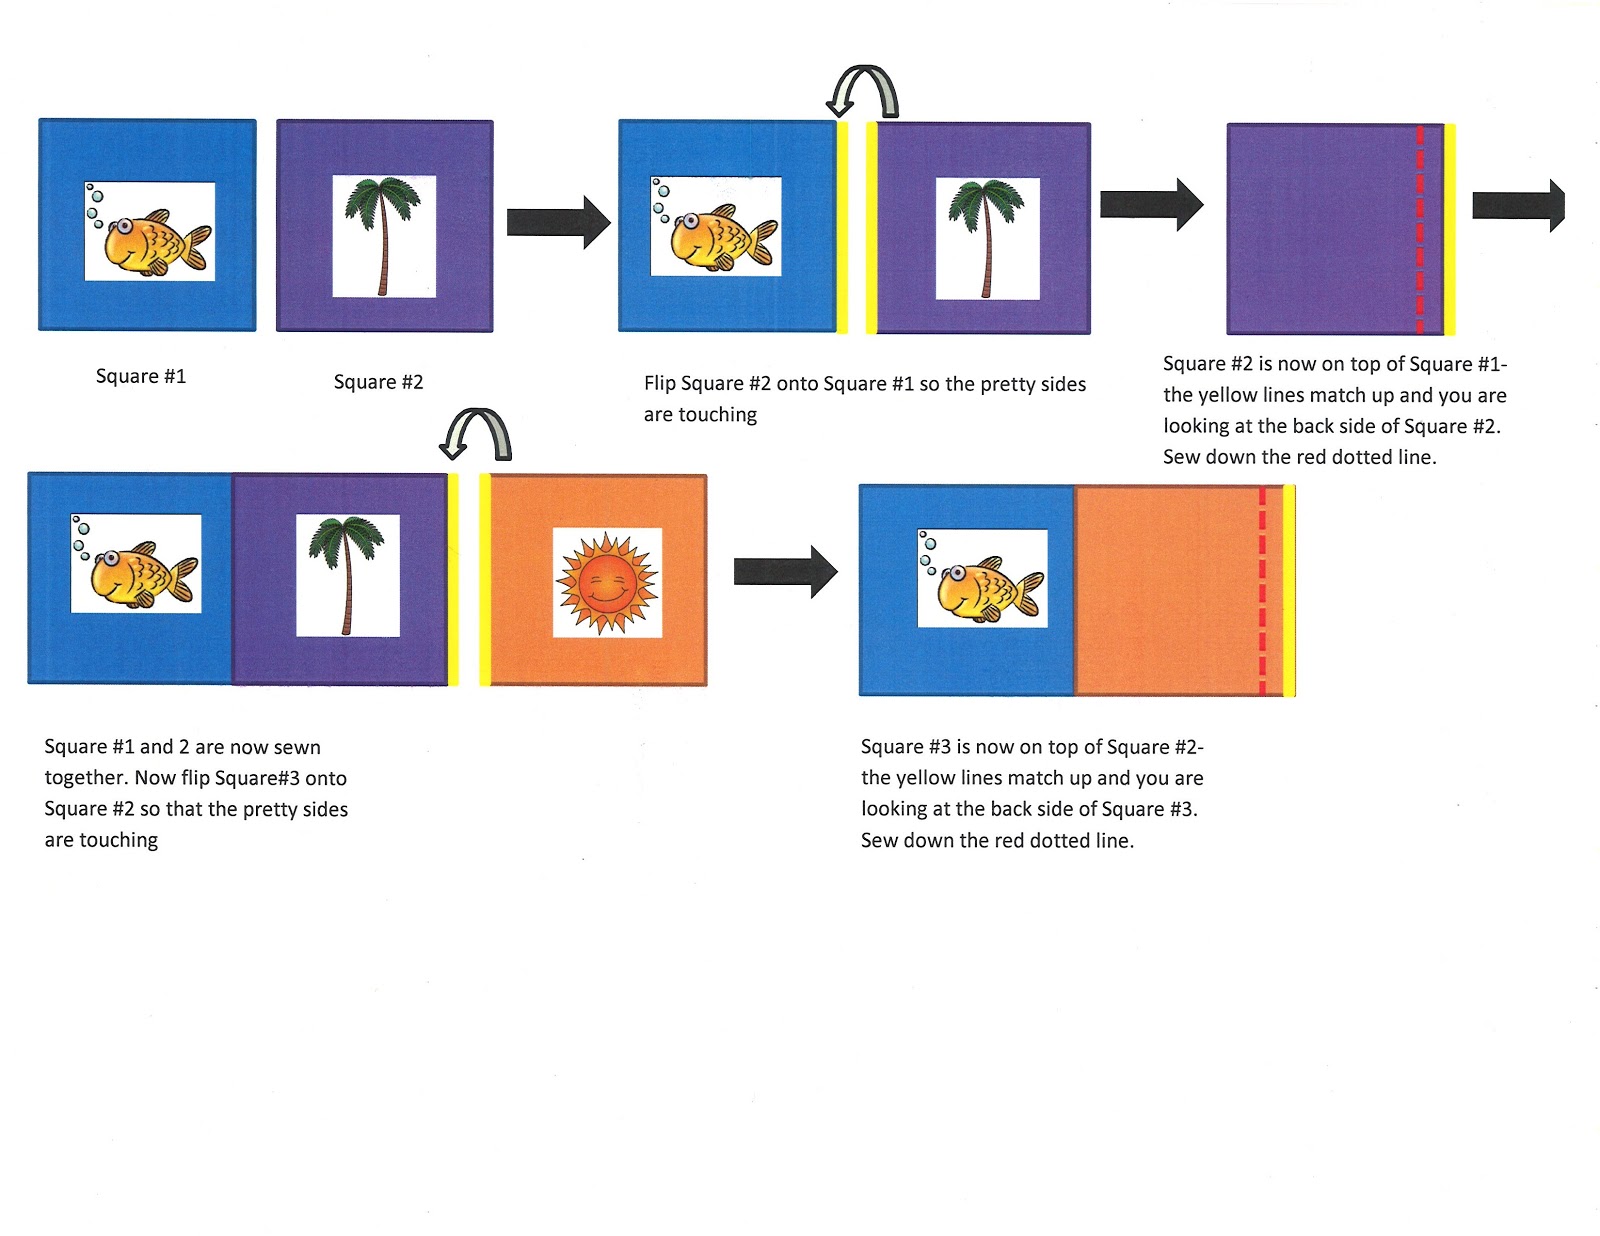
I feel like every tutorial on how to sew a quilt is written in a different language…I simply don’t understand sewing/quilting lingo but, I took bits and pieces of different tutorials and finally figured it out…here is my very dumbed down version of how to sew together the rows of your quilt:


After I sewed two full rows (9 squares across) I sewed them together (using the same concept as above…line up, flip, stitch, unfold). I quickly realized that interfacing would have made for a more professional looking (read: evenly lined up) quilt top…but was happy with the way it looked nonetheless.

I continued the “sew a row, attach a row” until my quilt top was 10 rows long.

Next up- a border, some batting, and some backing.

Stay tuned!

Wednesday, October 17, 2012

Join!

You can now be a member of Made with Love. Paid with Pennies!

Just click "join this site" over here --->
Joining is just like hitting the "like" button on facebook. It lets me know that you are reading what I am writing and lets you post comments/questions/suggestions.  This is different from the "follow by email" field.
In the blogging world, the more members the better...so help me out!

Thanks guys!

http://www.goinghometoroost.com/


Tuesday, October 16, 2012

Baby Steps: Lenny & Joes T-Shirt Quilt-Washing, Measuring, and Cutting (round 1)

There is a little place in a little town that I have a little (okay, big) obsession with.
I am not alone though; my parents, sister, aunt, uncle, and cousins all feel the same way.

It isn’t a fancy place; in fact it is just the opposite...The decor is minimal, the line to be seated is substantial, and the parking…a nightmare.
But, if you like the beach, a good lobster roll, and $5 t-shirts then I think you, like me (and my family), would love this little place.
http://www.etsy.com/listing/69484673/salt-air-hair-8x10?utm_campaign=Share&utm_medium=PageTools&utm_source=Pinterest
This little place (restaurant) is called Lenny & Joe’s and it’s in the little town of Westbrook, CT. We vacationed in Westbrook almost every summer when I was growing up. Lenny & Joe’s was always our go-to spot for dinner … and our parent’s go-to spot for happy hour(s).

 http://www.roadfood.com/Restaurant/Overview/1033/lenny-joes-fish-tale

Oh, and those $5 t-shirts I mentioned, I have over 20 of them- all different colors, different years, different designs.

The other day I sorted through my dresser and got rid of things that I no longer wear. As much as I love L&J’s, most of the 20 t-shirts fell into this category. Throwing these shirts out is not an option- no way, no how… but I know that they are just wasting space in my drawers.

My solution:
I am going to step out of my comfort zone, turn on my sewing machine and attempt to make a Lenny & Joe’s t-shirt quilt

**Please Note** Sewing is not exactly my forte. I have never sewed anything other than straight curtain panels and square pillow covers…this is going to be a lengthy process!

In order to successfully tackle this project, I am going to need to take baby steps. So, instead of writing one big post when I am finished (hopefully that day comes) I am going to write mini-posts as I go.

Without further ado:

Lenny & Joes T-Shirt Quilt:  Washing, Measuring, and Cutting (round 1).

Wash: I washed and dried all of the shirts and then laid them out on the floor to see what I am working with.


Measure: I am using an 6” block and want to make a fullish-sized quilt (every website I looked at had different measurements for full-size…but it is around 84" x 90").
I put my super strong math skills to good use- scribbled down a complex formula, used my TI-83, and called my math teacher sister to confirm that I will need 110 8” blocks.
Just teasing: 
Width: 84”/6”=14
Length: 90”/6”=15
# of blocks needed: 14x15=210

Cut (round 1): Most of the t-shirts have a small logo on the front and large one on the back. I plan on using both sides for my blocks.
I cut each t-shirt in half so that the front and back are now separate.

Stay tuned!